I am a member at large of the Astronomical League. I enjoy working through their observing programs, and while scrolling through the list, I noticed the
Radio Astronomy Observing Program. It ties nicely into my professional career and involves my favourite hobby, so I set off researching how to work towards the awards. I found that The Astronomical League web page has some good information to start.
The Itty Bitty Radio Telescope observation of the sun seemed like a nice, easy place to get my feet wet in radio astronomy. I read through some of the other observations required for the award and planned to make as much of the equipment I assemble forward compatible with as many of the other observations I could.
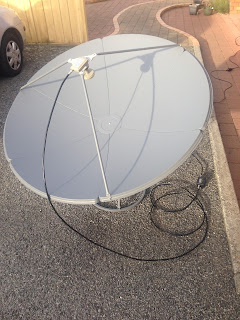 |
| My "Itty Bitty" Radio Telescope |
While reading about Hydrogen line observations I came across
this article that described some successful observations of Hydrogen line with a 1 meter dish. That seemed pretty promising to me, as I could use a 1 meter dish for the Itty Bitty Telescope (making it not so Itty Bitty) and Hydrogen line observation. After looking around some buy and sell ads, I came across a brand new 1.2 meter prime focus dish for $1 plus $9 shipping. It was an offer I could not refuse. I also managed to track down a prime focus LNB for the Ku band satellite TV stuff, so if I ever decide to re-purpose my telescope to watch TV, I will have everything I need.
Photos of assembly of dish and LNB:
 |
| Dish base and unboxing |
 |
| Dish Assembled |
 |
| Mounting the dish |
 |
| LNB support install |
 |
| LNB Mounted |
 |
| LNB |
 |
| Dish assembled |
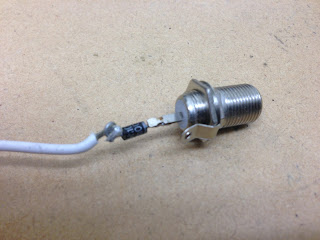
The next step in my project was to get a power supply to power the LNB. It needs between 12 and 20 VDC. Luckily, I had an old power cord from my laptop laying around. The end of the power cord had a break in it, so the laptop didn't charge, but that would work perfectly for this project. The output from the power supply is 20 VDC.
I cut off the end of the power supply and soldered in a diode to bring the voltage closer to 20V, and attached a female F-type connector onto it.
 |
| Power supply cord cut |
 |
| F type connector |
 |
| Diode |
Finally, the satellite finder arrived in the mail. I just bough a cheap one, as I plan to take it apart and modify it.
Then I connected all the active components together in the house and tested them. I connected the LNB to the satellite finder, and the power supply to the other end of the satellite finder. Each input to the satellite finder is labeled, so I just followed the labeling.
I had some concerns about the power supply and the satellite finder, as the power supply output is about 20V and the back of the finder says it can take up to 18V. I did some reading online, and found that some LNBs can take upwards of 24V momentarily, and that 20V is used to control some LNBs, so I decided to risk it by giving my finder 20V power.
The big moment of truth was when the satellite finder lit up and started making noise. I was glad I didn't cook the finder.
 |
| Test set up |
 |
| Power on! |
Next step is to try it outside fully assembled.


Comments
Post a Comment